Are you having problems to uninstall searchqu com from your computer right now? Do you desire to uninstall searchqu com thoroughly both from the program files but slow from Windows registry? If this is what bothers you right now, you are in the right please here for step-by-step solutions to remove searchqu com.
1.Click "Start > Control Panel" ("Start > Settings > Control Panel" on Windows XP).
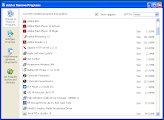
2.Open "Add or Remove Programs" ("Programs and Features" on Windows Vista)
3.Locate and highlight "searchqu com" from the installed program list.
4.Click the "Remove" button.
5.Choose "Yes" when prompted to uninstall searchqu com.
Sometimes when you uninstall a program from your computer, the folder that the program was installed in gets left behind, untouched. All of the files are gone, but the folder itself still remains.
1.Click "Start", click "Programs".
2.Open the icon labeled C:\Program Files. When a program is installed on your computer, it is installed inside this directory.
3.Look for folder of searchqu com you'd like to remove.
4.Right click on the folder you want to remove. Then, click "Delete." This will delete the folder from the "Program Files" folder.
5.Empty Recycle Bin to delete that folder from your computer permanently.
 Manual methods of deletion do exist for getting rid of the searchqu com application; however they are not as effective at completely removing the file when compared to a legit searchqu com removal tool. You will have to use the windows registry and locate all the files individually to get rid of it. But this action is only recommended for advanced computer users. If you delete something valuable it cannot be reversed, so you run the risk of destroying your entire operating system.
Why use HelpUninstaller?
HelpUninstaller is regarded as the most powerful uninstaller in the market nowadays. It helps to:
Manual methods of deletion do exist for getting rid of the searchqu com application; however they are not as effective at completely removing the file when compared to a legit searchqu com removal tool. You will have to use the windows registry and locate all the files individually to get rid of it. But this action is only recommended for advanced computer users. If you delete something valuable it cannot be reversed, so you run the risk of destroying your entire operating system.
Why use HelpUninstaller?
HelpUninstaller is regarded as the most powerful uninstaller in the market nowadays. It helps to:
Uninstall what you want (especially the corrupt programs on your computer) with its three powerful uninstall options: Uninstall, Force Uninstall, Special Uninstall. List detailed information about programs then you can intuitively view and easily uninstall the unwanted ones. Back up your Windows registry for a future usage when necessary such as get back you computer after an unexpected crash. Fully scan both of your drive and Windows registries to find any leftover entries for the just uninstalled program and permanently remove them from your PC.
If you want to remove searchqu com from your computer then it's highly recommended to use an uninstaller software. This way, you will be able to fully remove the program on the fastest, easiest and safest way.
A great uninstaller is called the searchqu com. It will fully remove any unwanted programs by doing 3 things.
1 - Firstly the searchqu com will uninstall the program.
2 - Once that has been finished, it will scan your drivers and your registry to find any left over files.
3 - Once that has been finished and the searchqu com has found some files, it will delete them.
This way, you've got the program 100% removed from your computer. Why don't you take a look at this uninstaller? Visit: searchqu com.
So, in order to remove searchqu com from your computer you can do 2 things. You either do it yourself, waste lots of your costly time and risk damaging your computer. Or, you use an uninstaller software to get rid of any unwanted program easily, fast and safely.
Want to get rid of this program?
Video Show: How to Install HelpUninstaller? You can follow these detailed steps below:
1. Download and save HelpUninstaller.
 2. Install and run it.
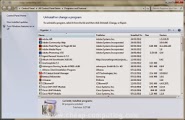
3. Locate Emerald Editor on the list and then click Uninstall.
 4. Follow the prompts till you fully uninstall searchqu com from your PC.
Video Show:How to Uninstall Program with HelpUninstaler
4. Follow the prompts till you fully uninstall searchqu com from your PC.
Video Show:How to Uninstall Program with HelpUninstaler
Uninstall searchqu com through the "Add or Remove Programs" Control Panel
1.Click "Start > Control Panel" ("Start > Settings > Control Panel" on Windows XP).
2.Open "Add or Remove Programs" ("Programs and Features" on Windows Vista)
3.Locate and highlight "searchqu com" from the installed program list.
4.Click the "Remove" button.
5.Choose "Yes" when prompted to uninstall searchqu com.
Sometimes when you uninstall a program from your computer, the folder that the program was installed in gets left behind, untouched. All of the files are gone, but the folder itself still remains.
1.Click "Start", click "Programs".
2.Open the icon labeled C:\Program Files. When a program is installed on your computer, it is installed inside this directory.
3.Look for folder of searchqu com you'd like to remove.
4.Right click on the folder you want to remove. Then, click "Delete." This will delete the folder from the "Program Files" folder.
5.Empty Recycle Bin to delete that folder from your computer permanently.
Uninstall what you want (especially the corrupt programs on your computer) with its three powerful uninstall options: Uninstall, Force Uninstall, Special Uninstall. List detailed information about programs then you can intuitively view and easily uninstall the unwanted ones. Back up your Windows registry for a future usage when necessary such as get back you computer after an unexpected crash. Fully scan both of your drive and Windows registries to find any leftover entries for the just uninstalled program and permanently remove them from your PC.
Remove searchqu com While Using An Uninstaller Software
If you want to remove searchqu com from your computer then it's highly recommended to use an uninstaller software. This way, you will be able to fully remove the program on the fastest, easiest and safest way.
A great uninstaller is called the searchqu com. It will fully remove any unwanted programs by doing 3 things.
1 - Firstly the searchqu com will uninstall the program.
2 - Once that has been finished, it will scan your drivers and your registry to find any left over files.
3 - Once that has been finished and the searchqu com has found some files, it will delete them.
This way, you've got the program 100% removed from your computer. Why don't you take a look at this uninstaller? Visit: searchqu com.
So, in order to remove searchqu com from your computer you can do 2 things. You either do it yourself, waste lots of your costly time and risk damaging your computer. Or, you use an uninstaller software to get rid of any unwanted program easily, fast and safely.
Want to get rid of this program?
Video Show: How to Install HelpUninstaller? You can follow these detailed steps below:
1. Download and save HelpUninstaller.
3. Locate Emerald Editor on the list and then click Uninstall.
No comments:
Post a Comment